IoT devices are devices that contain sensors to collect data and transfer them by means of internet
.These are advancing day-by-day.These devices are embedded into other system to facilitate our daily life. As long the device has the mentioned ability it is an IoT device. IoT by itself has numerous applications.They are ven used in monitoring and controlling appliances and machines.Smart speaker slike Alexa(amazon) is also IOT device.IoT can be set up to build home automation systems or may be also set up in bigger institutions to control working of all other electrical appliances.A smart watch is an simple example for an IoT device.Let us go through a comparison of watches in older times versus smart watches.This will help us know hat transformation IoT has brought.
Cloud Setup
Several cloud services has made it easier to collect ,store and transfer information and data read from the sensors.Suppose you read a temperature using the DHT11 sensor(humidity and temperature).In cloud services like ThingSpeak(by mathworks) , the reading are given as conditions.The fields in the cloud are the amount of data that you can add.The reading may be taken from the microcontroller as time mention while creating a channel ,with the help of API keys.That is you can use these APIs to interact with wifi application.There are read and write API keys available for us to read and update temperature data to the cloud.For example,if the temp is greater than 55 ,then you can provide an alert as notification through twitter or any other applications .This is the principle of an IoT fire alert system.React apps are available in ThingSpeak in order to support giving notifications.You can see Matlab visualizations through this cloud service .Variety of methods are there to provide commands,modify the conditions to make the devices perform activities, connecting the cloud and microcontroller.
Similarly for any system in ThingSpeak ,you are allowed to create channels.Each channel has read and write API keys through which we update information(reading) using them in the code we write for the microcontroller. Matlab visualizations and indicators are available in the channel page view and show changes depending on conditions provided in the channel settings.Using thing http application in the cloud you can connect to different application in IFTTT(If this then that) like google assistant,mails calendar etc by creating an applet. IFTTT is just an option.
Establishing connections
Now to coordinate and transfer reading in real time to the cloud you need to connect to the internet .This is possible with the help of wireless transmission services like Wifi. Zigbee can also be used ,but is more preferred for industrial purposes.So when it comes to connecting the microcontroller(our development board) to the internet ,we commonly use ESP8266 module, commonly known as WiFi module.
The communications occur with the help of AT commands.These commands are actually instructions to control a modem.It is also supported by GSM and GPRS modem/mobiles.
For example AT+RST helps you to reset the module.Using AT+CWMODE can help in choosing if the module needs to be a client or router. Similarly AT+CWLAP and AT+CWJAP help to locate the nearby available networks and Connect to a network respectively.TO disconnect from a network you can use the AT+CWQAP command.
We need to establish a connection with the internet or other networks to communicate.For that we need a port to be selected.A port help to uniquely identify a communication in network between a specified host and service. And the mostly commonly used is HTTP that has a port number of 80.In order to connect to the Thing Speak thus we have to specify the port number also in the AT+CIPSTART (used for connecting to cloud).there are total of 65535 ports available.
It is also recommended to upload a blank sketch at first to avoid future issue in programming.You should make sure that while uploading any program the correct port is selected.the COM port (Serial port) is an interface on PC .These are replaced by the USB port in new PCs.
Module Hardware
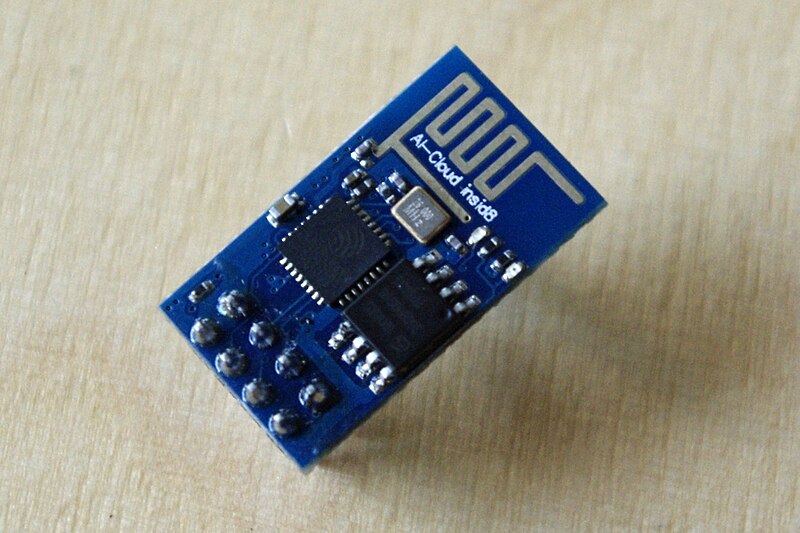
The ESP8266 is aTCP/IP protocol based module that gives internet access to the microcontrollers. The GPIO(General Purpose Input Output ) pins is useful to turn LED or relay on or off.There are 2 GPIO pins in this module.Along with this there are TX and RX serial pins for transmission and receiving of data between this and the microcontroller. The reset pins when connected to ground helps to reset the module. The Channel enable pins and VCC pins have to be powered with 3.3V for functioning of the module.The RX and TX pins are removed if we use 0 and 1 pins of the arduino while uploading the program to arduino else may burn out.You can otherwise use the other pins of arduino as serial pins using the SoftwareSerial library. Also there is an antenna present on the module to get connection .Ground pins of the module has to be connected to the ground pins of arduino.
Although ESP8266 is a microcontroller with wifi capability,it require external memory and antenna to work. S now instead of this you can use NodeMcu a popular micro controller added recently that support the ESP8266 .It was developed so as to replace the AT command with Lua scripting. NodeMcu has several GPIO pins .

That was about making you familiar with the IoT cloud services and methods of connection and communication and of course our WiFi module.See you again later with some more trending topics related to IOT .
Let us know about your interest -contact us by our mail ,or any social media platform provided.
Happy Reading!!!


0 Comments